
Getting Started with Badgy

So, I bought a Badgy! It seemed like something interesting and fun, vaguely related to my previous projects converting old Kindle screens into low-power ToDo lists, and I'd have something amusing to take to at least one convention and geek out about.
I had a few issues getting the examples to work, so I've written down the "get started from a complete beginner's perspective" to help anyone else who recently managed to get in on the Tindie order.
This post will go through modifying the provided example to show your name.
Badgy Itself
Badgy comes without any kind of case or power supply. That's fine - they actually provide a design to use to 3d print a case, or you can use one of the ones other folk have made and published. Or, I dunno, whittle one. I'm looking to make one to attach to a lanyard, so watch this space.
Setting up your Environment
At a minimum, we'll need to install and configure the Arduino IDE (1.8.5+). This is available both from their website as a downloadable installer, and from the Windows store.
Configuring the IDE
We'll now need to install the correct information for the board we're using.
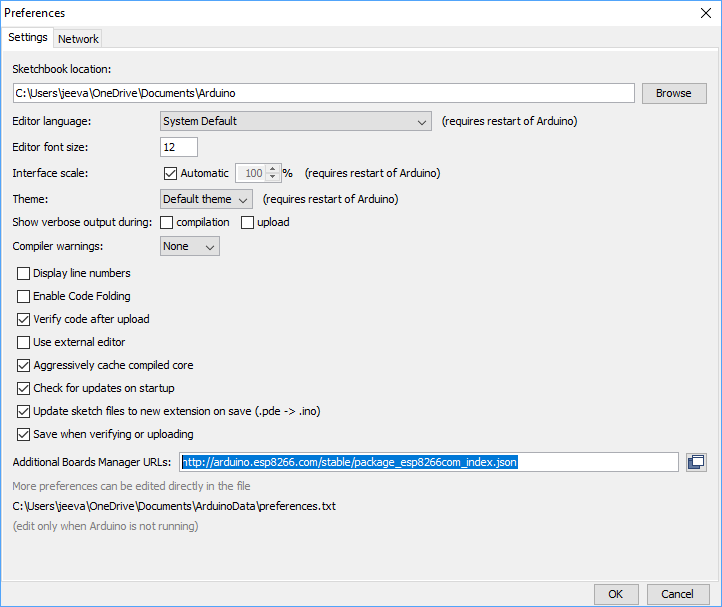
Navigate to File -> Preferences, and add http://arduino.esp8266.com/stable/package_esp8266com_index.json to the Additional Boards Manager URLs field.
Hit OK, and navigate to Tools -> Board "Arduino/Genuine Uno" -> Boards Manager.... We need to add the esp8266 board, so search for and install it.
Go back to the Board "Arduino/Genuine Uno" menu and select the (now installed) NodeMCU 1.0 (ESP-12E Module) option.
We now need to install or otherwise acquire the libraries that the examples require. Navigate to Sketch -> Include Libraries -> Manage Libraries....
The example we're going to use ('hello') uses the following libraries:
- Adafruit GFX library by Adafruit
- WiFiManager by tzapu
- GxEPD by ZinggJM
Annoyingly, GxEPD is not available from the library manager. It is available on GitHub, though the examples currently aren't compatible with the latest version available.
To get the older version, you could download the older version of the repository as a zip file, and then navigate to Sketch -> Include Libraries -> Add .ZIP Library... and provide the downloaded file.
Alternatively, you can use Git to clone the repository into your libraries directory and then reset it to the older commit. Your libraries directory is ~\Documents\Arduino\libraries by default.
cd ~\Documents\Arduino\libraries
git clone https://github.com/ZinggJM/GxEPD.git
cd .\GxEPD
git reset --hard 20eff1d80f7276a3c093183c3823cdd5f6cf1c9d
Modifying the Examples
So, we'll probably need to do something to change this lovely badge to say something else - my name, for example, rather than "Badgy".
If you haven't already done so, download the example files, and open hello.ino in the Arduino IDE.
You can navigate to Sketch -> Verify/Compile to immediately compile this, and the output should be pretty much identical to the hello.bin already contained in the example directory.
Below the block of #include statements, there's a line which defines the name variable. Changing this will result in the showHello() function writing.
/* change this to your name, you may have to adjust font size and cursor location in showHello() to perfectly center the text */
const char* name = "James";
That was easy, hey? Clicking Export compiled Binary on the Sketch menu will generate a bin file in the same directory as hello.ino.
Connecting to Badgy
Now we just need to upload this new bin file to Badgy. The quickest way to do this seems to configure Badgy to connect to your WiFi and upload the bin file.
Configuring WiFi
- Make sure Badgy is off (switch on the side closest to the USB connection)
- Power Badgy via USB or a CR2450/LIR2450 coin cell
- Hold down the center button and slide the power switch to on
- When the screen shows that it's ready to connect, release the center button
- Connect to the
Badgy APWiFi network - Connect Badgy to your WiFi network
- Badgy will now display an IP address!
Uploading
Uploading is simple - now that you have configured Badgy to connect to your network, restarting it whilst holding the center button will put it into update mode, and display the current IP address on the screen.
Navigate to the lightweight upload interface at $IPAddress:8888/update (shown on Badgy's screen) in any browser, and browse for your generated bin file. Click upload, and the Badgy will update itself and automatically reboot.
Congratulations! You should see your name on the screen!